Hi Everyone,
How is everyone? Thought I'd just do a quick post. I made this card, us for my neighbour Linda's daughter Charlene, who had a little girl on the11th June. Congratulations to you all. Can you guess which digikits I used?
Did you guess? I used the Spellbinders Grand Big Scalloped circle dies to cut the shapes out of contrasting backing papers from the FM New Baby kit. I always use super smooth card for my images and when I make a rocker card I also print the backing papers on the same card, which is 220gsm, to give extra strength.
The largest die is used twice, once in plain white 300gsm card, which is scored in half and folded, to form the rocker base, then again in the patterned paper. The next layer is the third largest, which is then mounted with double sided foam. All the edges were distressed with Tim Holtz spun sugar and faux stitching was added to both layers using a pale pink fine line pen.
There are several images to choose from in the kit, but I thought this one was so cute, especially as Charlene is a new Mum. I can remember when I was a new Mum (just) my baby was never far away from me. I used the crop tool to make some decoupage layers and mounted them with foam pads to add some dimension.
To add the baby's name I used the bunting from FM Playtime. This bunting can be used for any length sentiment, just crop a couple and join them. The letters are also in the digikit. Brooke Anne, what a beautiful name, they were also mounted with foam for dimension. The flowers are from my stash, you can see that tale here. I think I have enough to last my lifetime. I added some glamour dust to the centre of the flowers to add a bit of sparkle.
Some card candy, new baby ribbon in pink and a matching box and the card is done. Charlene and Linda loved it, looks like I may have some new customers, they had no idea I made cards.
I am entering this card into the following challenges:-
Thank you for coming by, do come again.
Love
xx
My papercraft and crochet blog, a place to inspire and share crafty bits.
Showing posts with label Craftartist2. Show all posts
Saturday, 28 June 2014
Saturday, 24 May 2014
Get Well Soon with Fizzy Moon.
Hi Guys',
How is everyone? I promise not to mention the miserable weather, but I have to mention the cool storm we had here in Spalding on Friday. It lightened and thundered, right overhead, non stop for a good fifteen minutes, all the while absolutely shuttering it down. Not seen one like that in many a year, I was out in it too. The supermarket windows were rattling.
Anyway, back to the business of today. Went to see a lovely lady last week, who is just recovering from a hip replacement. My friend Sue and I took her out for lunch. I was amazed as to how quickly she's recovering. I can only put it down to her age, being a veritable youngster of sixty. Well I had to take her a card and a little gift, didn't I. So here it is.
I really love my Fizzy Moon digikits, there is something in there for every occasion, including get well, of course. I used a peek a boo style, using double sided papers in contrasting colours. I love this style, a bit fiddly, but very effective.
As you can see, the flaps give lovely dimension. I printed onto 200gsm supersmooth card, cut a cross with my craft knife, then curled back and secured with small brads. I use card, as opposed to paper, because I don't want the flaps to lay flat.
The topper was from the Fizzy Moon Playtime digikit, printed twice, then decoupaged. I made the sentiments using the ticker tape style font. I thought they were very apt, especially the 'Hip Hip Hooray' one. Some Rafia and a teddy charm to finish, and it was done.
Now you know me and my boxes, I have to make a matching box, especially with all that dimension. Then there's the present.
I made a couple of matching gift bags and tags in two different sizes, because I hadn't decided what to take her as a gift. Anyway, the first one turned out to be too small for the chocolates, so I opted for the larger one. I was pleased with the matching set, I think Margaret was too.
I am entering this card into the following challenges :-
Thanks for coming by my blog, do come again.
Love,

Thursday, 27 February 2014
Typography Greetings Cards, batch made.
Greetings all,
Did you ever get to the stage where you were putting inserts in up-side down, dripping glue where it shouldn't be, getting the sticky of the cello bag stuck to your card front, putting the wrong inserts in the wrong cards. Shall I go on? Yeah, I think you may have been there, well, that's where I was ten minutes ago, so I've taken a break and will update my blog while the jinx leaves.
I can see you all wondering what I was up to. Well here's the thing, I have two craft shows coming up in the near future, so I decided to batch make a few cards to boost my stock.
I'm still enjoying making typography cards, which seem to be quite popular this year. What's more, once the initial design is decided, the lettering can be changed for just about any occasion.
So my marathon batch covers Mum, Sis, Daughter, Friend, Dad, Brother, Son, Pal, Thinking of you and Anniversary.
I changed the theme a bit on the male cards, but the principal is the same. All the cards were designed in CAP2 using various digi kits. I just gathered lots of different letters from various alphabets so that I had a nice selection.
I chose a few nice backing papers and some embellishments to match. I like the Kraft paper I used for the male cards, I use this paper a lot. All the toppers were distressed with Tim Holtz and I finished them all with card candy and either bakers twine or raffia and either a heart or star 'Hand Made With Love' charm.
So, twenty four made.....
...........and sixteen to go.
Phew, I do hope they sell.
I am entering these cards into the following challenges :-
Thank you for coming by and do come again. If you could leave a comment to let me know what you think, that would be great.
Love,
Jools. xxxx
Did you ever get to the stage where you were putting inserts in up-side down, dripping glue where it shouldn't be, getting the sticky of the cello bag stuck to your card front, putting the wrong inserts in the wrong cards. Shall I go on? Yeah, I think you may have been there, well, that's where I was ten minutes ago, so I've taken a break and will update my blog while the jinx leaves.
I can see you all wondering what I was up to. Well here's the thing, I have two craft shows coming up in the near future, so I decided to batch make a few cards to boost my stock.
I'm still enjoying making typography cards, which seem to be quite popular this year. What's more, once the initial design is decided, the lettering can be changed for just about any occasion.
So my marathon batch covers Mum, Sis, Daughter, Friend, Dad, Brother, Son, Pal, Thinking of you and Anniversary.
I changed the theme a bit on the male cards, but the principal is the same. All the cards were designed in CAP2 using various digi kits. I just gathered lots of different letters from various alphabets so that I had a nice selection.
I chose a few nice backing papers and some embellishments to match. I like the Kraft paper I used for the male cards, I use this paper a lot. All the toppers were distressed with Tim Holtz and I finished them all with card candy and either bakers twine or raffia and either a heart or star 'Hand Made With Love' charm.
So, twenty four made.....
...........and sixteen to go.
Phew, I do hope they sell.
I am entering these cards into the following challenges :-
Thank you for coming by and do come again. If you could leave a comment to let me know what you think, that would be great.
Love,
Jools. xxxx
Thursday, 20 February 2014
Paper piecing and colouring with Craft Artist Professional 2.
Good morning everyone,
Hope you're all well. Been doing something a little different this past few days. About a month ago a free digi stamp was posted on the 'Serif CraftArtist Creative Cappers' Facebook page, with the challenge to have a go at colouring or paper piecing.
Although I consider myself to be quite adept when using CAP2, this was something I'd not attempted. I guess I was the old fashioned, print it or stamp it, then colour it with whichever medium type. Any way, I decided to have a bash and here are the results. This is the naked digi, so to speak.
Now I love a challenge and colouring OR paper piecing was an even bigger challenge to me. I decided to have a go at both. There are some excellent tutorials on the Creative Cappers group page, written by Catherine Carney. They are easy to follow and accessible if you are a group member. It's an excellent group guys', very supportive, why not pop along and have a look. The link is further up.
Here's the finished image. I'm very proud of this, I used gradient effects and shading to make it look more hand coloured. The shawl and patch are paper pieced. Again, all the instruction, by way of a simple, easy to follow tutorial, are on the group page.
I made the digi into a flat, digital card to celebrate Mothers' Day and here it is. Da Da. Can you tell I'm a bit chuffed.
Now, I enjoyed doing the colouring and paper piecing and shall definitely have another go. I also like making the finished card all within CAP2. I do this often. What I do miss sometimes though, is the actual playing with paper and glue. Don't ya just love it, sticky fingers and mess. I digress.
I decided to break the file down and print off the individual elements, to assemble into a card. I wondered if it would be as effective. Here it is, what do you think?
There were a few things I altered slightly. I decoupaged the bear, to give some dimension. The flower didn't work either, it was too fiddly to cut out and much too flat. Also, the fabric buttons. I used card candy in their place. I used a Spellbinder to cut the sentiment out and added some raffia to the spine to finish off, but I did put the faux stitching around the edges.
I enjoyed this project, I just need to upload it onto the group page now. Now there is a warning I'd like to issue before I go. I found this project to be highly ADDICTIVE. So unless you have loads of time to spare, every day, every week, every month, until you stop crafting........ Don't Do It!!!! Just kidding, but don't say you weren't warned. :)
I am entering this card into the following challenges -:
Thanks for coming by and reading my ramblings and do come again.
Bye......
Jools. xxxx
Hope you're all well. Been doing something a little different this past few days. About a month ago a free digi stamp was posted on the 'Serif CraftArtist Creative Cappers' Facebook page, with the challenge to have a go at colouring or paper piecing.
Although I consider myself to be quite adept when using CAP2, this was something I'd not attempted. I guess I was the old fashioned, print it or stamp it, then colour it with whichever medium type. Any way, I decided to have a bash and here are the results. This is the naked digi, so to speak.
Now I love a challenge and colouring OR paper piecing was an even bigger challenge to me. I decided to have a go at both. There are some excellent tutorials on the Creative Cappers group page, written by Catherine Carney. They are easy to follow and accessible if you are a group member. It's an excellent group guys', very supportive, why not pop along and have a look. The link is further up.
Here's the finished image. I'm very proud of this, I used gradient effects and shading to make it look more hand coloured. The shawl and patch are paper pieced. Again, all the instruction, by way of a simple, easy to follow tutorial, are on the group page.
I made the digi into a flat, digital card to celebrate Mothers' Day and here it is. Da Da. Can you tell I'm a bit chuffed.
Now, I enjoyed doing the colouring and paper piecing and shall definitely have another go. I also like making the finished card all within CAP2. I do this often. What I do miss sometimes though, is the actual playing with paper and glue. Don't ya just love it, sticky fingers and mess. I digress.
I decided to break the file down and print off the individual elements, to assemble into a card. I wondered if it would be as effective. Here it is, what do you think?
There were a few things I altered slightly. I decoupaged the bear, to give some dimension. The flower didn't work either, it was too fiddly to cut out and much too flat. Also, the fabric buttons. I used card candy in their place. I used a Spellbinder to cut the sentiment out and added some raffia to the spine to finish off, but I did put the faux stitching around the edges.
I enjoyed this project, I just need to upload it onto the group page now. Now there is a warning I'd like to issue before I go. I found this project to be highly ADDICTIVE. So unless you have loads of time to spare, every day, every week, every month, until you stop crafting........ Don't Do It!!!! Just kidding, but don't say you weren't warned. :)
I am entering this card into the following challenges -:
Papertake Weekly Challenge - Lovely layers.
Craft-room Challenge - Colour challenge.
Ladybug Crafts Ink TLT Challenge - Flowers galore.
Thanks for coming by and reading my ramblings and do come again.
Bye......
Jools. xxxx
Thursday, 13 February 2014
Happy Birthday in the pink.
Good morning everyone,
Well, dare I say this, it's a beautiful day here in Lincolnshire. I do hope the less fortunate people down in the south of England are enjoying a bit of respite too.
I said I would go away and make some cards with all the Gelli prints I did and post them to show my efforts. What a plonker, the cards I had to make are for friends, who follow both my Facebook page and blog. So can't post those yet.
I can post this one though, because it's not for anyone in particular.
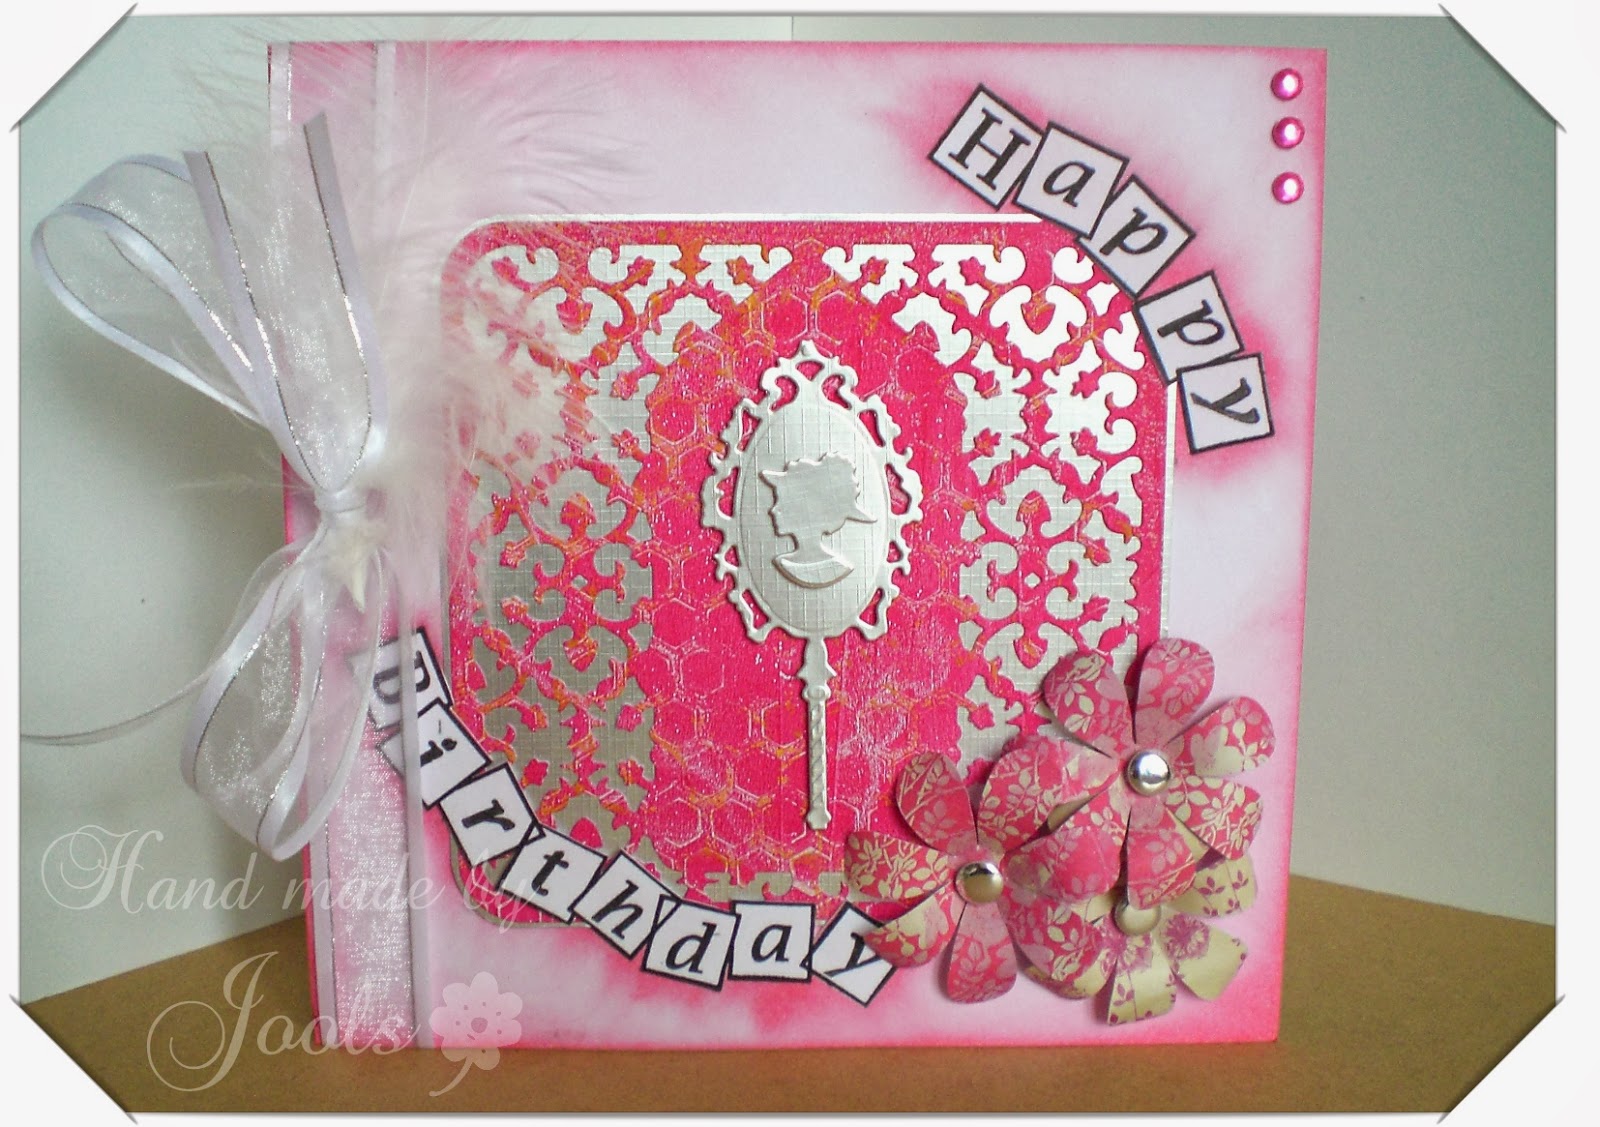
I went a bit mad on this one, couldn't decide what theme to use, so I decided to use dies. I thought the background was a bit too dark and needed breaking up, so the lovely indulgence die from Tonic was ideal. It's so lovely with it's filigree effect. I decided not to use a tag, just the hand mirror and cameo.
The 'Happy Birthday' was stamped with the Clarity letterbox set and I cut around the letters to insert the topper. I've seen Barbara do this often and think it's a great technique, and now I can do it too.
The flowers were made in CAP2. I made a punch, cut out the flower from some material and then used the stamp feature to duplicate it in different sizes. Got a bit carried away though, I've got hundreds now. It's so therapeutic though, cutting out. I do it on my lap tray while I'm watching TV. How many others out there do that?
I finished with white and silver ribbon, a white feather, for a bit of fru fru, and some pink gems.
Hope you like it and thanks for popping by. Do leave a comment so that I know you've been, I can drop by your blog then. That's if you have one of course.
I am entering this card into the following challenges :-
Bye for now...
Jools. xx
Well, dare I say this, it's a beautiful day here in Lincolnshire. I do hope the less fortunate people down in the south of England are enjoying a bit of respite too.
I said I would go away and make some cards with all the Gelli prints I did and post them to show my efforts. What a plonker, the cards I had to make are for friends, who follow both my Facebook page and blog. So can't post those yet.
I can post this one though, because it's not for anyone in particular.
I went a bit mad on this one, couldn't decide what theme to use, so I decided to use dies. I thought the background was a bit too dark and needed breaking up, so the lovely indulgence die from Tonic was ideal. It's so lovely with it's filigree effect. I decided not to use a tag, just the hand mirror and cameo.
The flowers were made in CAP2. I made a punch, cut out the flower from some material and then used the stamp feature to duplicate it in different sizes. Got a bit carried away though, I've got hundreds now. It's so therapeutic though, cutting out. I do it on my lap tray while I'm watching TV. How many others out there do that?
I finished with white and silver ribbon, a white feather, for a bit of fru fru, and some pink gems.
Hope you like it and thanks for popping by. Do leave a comment so that I know you've been, I can drop by your blog then. That's if you have one of course.
I am entering this card into the following challenges :-
Claritystamp challenge blog - Love and Romance.
Challenges 4 Everybody - Anything goes.
The ABC Challenge - E is for Embellishment.
Bye for now...
Jools. xx
Wednesday, 30 October 2013
Silver Wedding Anniversary Card.
Hi Guys',
A good morning to my fellow bloggers, from a beautiful sunny Spalding, cold, but beautiful. Thought I'd share one of my several silver wedding anniversary cards that I've made in the past couple of months. Did something relevant happen in 1988, or is it just that my friends are of that age group where they're all celebrating their silver wedding? I think it may be the latter.
Todays card was for one of the girls at work, to give to her loving husband. The brief was to incorporate some kind of invitation for the special trip she'd planned as his present.
The card was designed in CAP2 in neutral cream, black and grey, to make the card more masculine. The backing paper is a simple broiderie type design, in cream and grey and to add that special touch, I stamped 25 randomly all over it. For the greeting I made a tag with calligraphy type text, in keeping with the wedding theme. I added shadows to give the appearance of depth and finished it off with a heart embellishment. It was then attached to the card with black and silver ribbon.
The invite part was the most troublesome, so I decided to make another tag and put it into a pocket.
To finish, I added some decorative cut-outs, using the same design as the backing paper, with some black card candy for extra detail.
I boxed the card, again using the same design as the backing paper.
Hope you like it and thanks for popping by.
I am entering this card into the following challenges :-
See you soon.
Jools. xx
A good morning to my fellow bloggers, from a beautiful sunny Spalding, cold, but beautiful. Thought I'd share one of my several silver wedding anniversary cards that I've made in the past couple of months. Did something relevant happen in 1988, or is it just that my friends are of that age group where they're all celebrating their silver wedding? I think it may be the latter.
Todays card was for one of the girls at work, to give to her loving husband. The brief was to incorporate some kind of invitation for the special trip she'd planned as his present.
The card was designed in CAP2 in neutral cream, black and grey, to make the card more masculine. The backing paper is a simple broiderie type design, in cream and grey and to add that special touch, I stamped 25 randomly all over it. For the greeting I made a tag with calligraphy type text, in keeping with the wedding theme. I added shadows to give the appearance of depth and finished it off with a heart embellishment. It was then attached to the card with black and silver ribbon.
The invite part was the most troublesome, so I decided to make another tag and put it into a pocket.
To finish, I added some decorative cut-outs, using the same design as the backing paper, with some black card candy for extra detail.
I boxed the card, again using the same design as the backing paper.
Hope you like it and thanks for popping by.
I am entering this card into the following challenges :-
See you soon.
Jools. xx
Sunday, 27 October 2013
Happy 8th Birthday for a Boy.
Hi Guys',
Just thought I'd do a quick blog post before I take my pooch for a walk. She'll not be getting one later, the wind doth blow already, but at least the sun is shining. Here comes the storm, perhaps the weathermen are getting better.
Anyway, enough waffling, down to business. My only brief was that he's a typical boy, oh, and he's a twin. Non-identical though, because the other twin is a girl. I'll post her card another day.
I designed the card in CA2, my fave toy, using an image from Clipartfairy. The number eight was created by typing a chunky no8 and dragging it into the punches section on the right, thus turning it into a punch. I then punched out the number from some blue paper and went into format to add some visual effects.
In this instance I just ticked the 'bevel and emboss'. I love to play around with the visual effects, trouble is, I forget what I did to get the effect and usually can't replicate it. That was until I found a tutorial on one of the 'Creative CAPpers' group pages. Go take a look, a very helpful group.
I distressed the edges with Tim Holtz stormy skies, added some flags and candy and personalised the topper by adding Joel's name to the side of the car, before cutting it out and mounting it with mounting foam.
That's all for now, my pooch is getting a bit stir crazy, so off to wear her out.
I am entering this card into the following challenges :-
Have a lovely day and thanks for popping by.
Jools. xx
Just thought I'd do a quick blog post before I take my pooch for a walk. She'll not be getting one later, the wind doth blow already, but at least the sun is shining. Here comes the storm, perhaps the weathermen are getting better.
Anyway, enough waffling, down to business. My only brief was that he's a typical boy, oh, and he's a twin. Non-identical though, because the other twin is a girl. I'll post her card another day.
I designed the card in CA2, my fave toy, using an image from Clipartfairy. The number eight was created by typing a chunky no8 and dragging it into the punches section on the right, thus turning it into a punch. I then punched out the number from some blue paper and went into format to add some visual effects.
In this instance I just ticked the 'bevel and emboss'. I love to play around with the visual effects, trouble is, I forget what I did to get the effect and usually can't replicate it. That was until I found a tutorial on one of the 'Creative CAPpers' group pages. Go take a look, a very helpful group.
I distressed the edges with Tim Holtz stormy skies, added some flags and candy and personalised the topper by adding Joel's name to the side of the car, before cutting it out and mounting it with mounting foam.
That's all for now, my pooch is getting a bit stir crazy, so off to wear her out.
I am entering this card into the following challenges :-
Have a lovely day and thanks for popping by.
Jools. xx
Sunday, 15 September 2013
Happy Birthday Special Friend with Fabulous Fashion by Katysuedesigns.
Hi bloggers,
Well what a wet Sunday and it's freezing. I think we've all been so spoilt with the beautiful warm weather, we may have become soft. Well I think I have. I had a weak moment and put the heating on, it's lovely and cosy now.
Not been blogging much, the weather has been too nice to sit indoors, so I'll have to make up for my tardiness. Got lots of cards to show you, so I thought I'd start with my latest one. This one is a birthday card for a special friend. I hadn't used my new 'Fabulous Fashion' cd, so I though I'd give it an outing.
There are so many beautiful designs to choose from, I could hardly decide. The artwork is so unusual and pretty. The card is for a very feminine lady, so I thought this one was ideal. The decoupage designs are click and print on the cd and this one has a matching hat, which I think is great. There are handbags to match as well, a very girly cd.
I used a large 8x8 scalloped card to make an easel, I seem to have been making lots of rocker cards lately, so thought an easel would be a change. Also, the topper definitely suited an easel card. The spotty backing paper was from the forever friends 'Black & Gold' cd.
I added a tag with a little witty verse and attached it with a butterfly brad, then to finish a few flowers and some card candy.
On the back I added another verse, with somewhere to write and then made a box, using the same spotty design.
Hope you like it. If you've not seen these designs before, check out the cd on youtube. Noreen does some great demo's on there.
I' entering this card into the following challenges :-
A Gem Of a Challenge - 2 Images.
Paper Crafting Journey - Flowers.
Challenges 4 everybody - Anything goes.
Crafty Sentiments Designs Challenge Blog - Anything goes.
See you soon,
Jools. xxxx
Sunday, 26 May 2013
Typography Happy Birthday rocker card for Daughter-in-law.
Hi Guys',
Well, where do I start, it's been so long I don't know if I can remember how to post on my blog. I won't go into the boring details, but so much has happened lately, hence, no posts.
I'm working part time again. Started in December. Was getting too bored living the life of riley, and my gadding in my camper isn't cheap, so killing two birds with one stone. I've also got a puppy. A beautiful little black and white cockerpoo called Bella. She'll be lovely company in the van, once she's past the stupid stage :) Pop over to my other blog and have a read at our goings on in the camper. And finally, I'm building a website for handmade bespoke wedding stationery. Now there's a job and a half. I'll keep you posted on my progress.
Now down to the business of the day. I made a couple of cards this week in the style of 'Typography'. It seems to be everywhere, so I thought I'd have a go.
This first card was for one of the girls at work, for a special Daughter in Law.
It's a rocker card designed using Craftartist2, in my favourite colour. Yes, you guessed. Lilac. I do love it when a customer tells you just to make it pretty and gives you artistic license.
The backing papers and topper design are from the Clipart Fairy 'Flowers and Butterflies' range. I used the Spellbinders grand big scallop for the card body, glittered all the edges and decoupaged the butterflies.
Well, where do I start, it's been so long I don't know if I can remember how to post on my blog. I won't go into the boring details, but so much has happened lately, hence, no posts.
I'm working part time again. Started in December. Was getting too bored living the life of riley, and my gadding in my camper isn't cheap, so killing two birds with one stone. I've also got a puppy. A beautiful little black and white cockerpoo called Bella. She'll be lovely company in the van, once she's past the stupid stage :) Pop over to my other blog and have a read at our goings on in the camper. And finally, I'm building a website for handmade bespoke wedding stationery. Now there's a job and a half. I'll keep you posted on my progress.
Now down to the business of the day. I made a couple of cards this week in the style of 'Typography'. It seems to be everywhere, so I thought I'd have a go.
This first card was for one of the girls at work, for a special Daughter in Law.
It's a rocker card designed using Craftartist2, in my favourite colour. Yes, you guessed. Lilac. I do love it when a customer tells you just to make it pretty and gives you artistic license.
The backing papers and topper design are from the Clipart Fairy 'Flowers and Butterflies' range. I used the Spellbinders grand big scallop for the card body, glittered all the edges and decoupaged the butterflies.
The typography was easier than I thought it would be. I just imported several different letter sets from my digi kits, and typed in the words. Craftartist chooses a mixture of letters automatically. If you don't like the choice, just change it. Each letter is editable. Then I tilted a few, sent some to the back and added a shadow.
To finish I added a Hunkydory sentiment, some lilac card candy and a lilac bow from my stash.
I think it looks great, hope you do too. My customer loved it.
I am entering this card into the following challenges :-
Joanna Sheen - Girls, Girls, Girls.
Craft 4 Eternity - Get into shape.
Fab 'N' Funky - Ribbon and/or lace.
Great to be back,
see you soon.....
Jools.
Tuesday, 13 November 2012
Wedding place cards and wine bottle labels with Craftartist2 professional.
Hi guys,
Hope you're all well. Thought I'd share some wedding place cards and wine bottle labels with you, that I made for my nieces friend.They were designed using Craftartist2 Professional, and I must say, I'm liking this programme, a lot.
There's not a lot to say, other than I used the template within CA2, and the digikits I used were 'Butterfly elegance' and 'Daydream.
I didn't do the wine labels that have to be stuck onto the bottles, I think these that sit on the bottle neck are much more attractive.
I really love the new sticker feature in CA2, the image and the text really looked like they were jumping off the page.
The bride didn't want the back of the place card to be blank, so I added a quote, and of course did a bit of advertising while I was at it. You never know, I made 60, so a few people may pop accross to my blog.
I am entering this project into the following challenges -
Cards for Men - Anything goes
Forever Friends Challenge Blog ( monthly ) - Anything goes.
Hope you like them. (what's wrong with blogger today, it's so slow?)
See ya soon and thanks for coming by.
Jools. xxx
Subscribe to:
Posts (Atom)
.jpg)


.jpg)
.jpg)
.jpg)
.jpg)
.jpg)
.jpg)


.jpg)


.jpg)