Friday, 27 April 2012

Tilda Hula-hoop Birthday Rocker.


Good crafternoon crafters,

Who does that sound like? Anyway, hello to you all and a special hello to my new followers. Welcome to my blog, hope you enjoy visiting and thankyou.

Today's card is a tilda rocker. I felt like doing a bit of colouring, (one day I may grow up) so I stamped Tilda out several times and used different colourways to colour her in. I never know what colour card I'm going to make until the urge takes me, so to speak. The one I chose in the end is pink and lilac.


The rocker and all the layers are made with spellbinders grand large scallop, I offset each layer this time to make it a bit different. I stamped with memento ink and used promarkers to colour the image in. I just love these pens, even more since I bought some fine tips. They make it so easy to get light and shade. Some stitching detail was added around the smallest layer and Tilda was mounted with foam to give dimension.  The backing paper is from the tulip and friends range and the sentiment from cardart. The edges of all the other layers were distressed with Tim Holtz milled lavender and I added a bit of glitter, flowers and ribbon from my stash.


I had to do a variation on the design of the this rocker, my daughter said that the one I sent her wouldn't stand up. I told her not to stand it on a shiny surface, but she said it still kept laying down.


So I cut a piece of the same white card I'd used for the main rocker base and attached it inside the card to the front and back. It worked a treat. No more Bambi on ice.


Put a crease in the middle and fold it in on itself and the card lies flat for posting. Now the only thing I have to do is decide what to do with all the other Tilda's. I suppose I could make four more different coloured rocker's. :)


Aren't they cute.


I'm entering this card into the following challenges :-

Simon Says Stamp Challenge - Anything goes.
Passion For Promarkers - Cut it out.


Thanks for visiting, hope you like them. If you'd like to leave a comment I'll know you've been and then I can visit your blog. See you soon.

Jools. xxx


Tuesday, 24 April 2012

Birthday card with panpastel tints


Good evening everyone,

Hope you've all had a nice day. Can we hope that the weather has now turned the corner and we can start enjoying some spring weather. Here's hoping.

Today's card continues with the panpastel theme and  because I'm having so much messy fun, I thought I'd  make a nice frilly, girly card. These are just so pleasing to make aren't they, a few bows and flowers and hey presto. I've got three boy cards to make in the next couple of weeks and we all know how easy boy cards are to make, don't we.


The three colours I used are from the panpastel tints range. I think they're lovely, so fresh and feminine. They'd be lovely on a baby card too.  The background of the card, label topper and butterfly were all stamped with  a little daisy and versamark ink for a resist effect. I'm not sure if the tints would be striking enough without the resist, as you can see, the daisies are much darker. My daisy is a Woodware stamp from the daisy tag set. After applying, I fixed the panpastels with cheap hairspray, valuable tip Eileen, thanks.


The butterfly, flower and flourishes are all spellbinders. Again, they were all coloured using  panpastels, sealed and then spattered with some glitter ( of course ) A few self adhesive pearls for the butterfly and some lace threaded through a punched hole and the tag is finished.

The tag is quite big so I used an 8x8" scalloped card. Some more lace to tie a bow along the spine of the card, a bit of card candy and a cardart sentiment to finish. I added a 'Hand Made' card charm to this one, I think it just gives that finishing touch.

Hope you like it and thanks for visiting. 


I will be entering this card in the following challenges :-

The ABC Challenge -  N for Neutral
SimonSays Stamp Challenge - Anything goes.
Fab'n'Funky - No DT.
Joanna Sheen Challenge Blog - Someone special.


Have a nice evening,

Jools. xx

Saturday, 21 April 2012

Pan Pastel labels and gilding flake teaser.

Good afternoon blogging buddies,

Well it's taken me a while to create anything half decent, but here they are (as promised Eileen)  My first publicised attempts at using Pan Pastels. My bin is full to the brim with failed attemps, my craft room is a tip and my fingers are covered in ink and stuff,  but I have to say, I really enjoyed myself. They're not perfect, I like to call them a work in progress, but hey. This first one is my favourite, probably because it's the best. :)


I decided to follow the lead of quite a few crafters out there and do my first ones on labels. I can decide what to do with them later. I must admit though, they are quite effective, especially while I'm practicing. I stamped with versamark and a floral swirl for a resist effect background using blue and lemon pan pastels from the tints range. I must say, they go on like a dream. The image is a magenta stamp that I picked up in a craft outlet shop. I used Versafine ink and then clear embossed before colouring with promarkers. The butterflies are spellbinder Wonderful Wings , with the same resist effect as the main image.

This next one is done in more vibrant colours and I learned a valuable lesson doing this one. If you use strong coloured pan pastells you can't then use promarkers, it doesn't cover, just transfers onto the promarker.


So what I did instead was to glitter the areas I wanted to highlight, with a quickie glue pen and glamour dust. I think it's quite effective. I might have a go at using gilding flakes instead. The flower is the spellbinder   daisy die, coloured with the same pan pastells and a fancy button in the centre to finish off.  ( Over inked a bit on this one, but you didn't notice did you?) Hope you like 'em.


Now for my little tease. I've had gilding flakes for a while now and not really done much with them, so I went onto youtube to see what I could find. Look at this beautiful technique.


All you need is a piece of double sided sticky sheet cut to the size you need, strips of backing paper and gilding flakes.  I made this one last night.

Can you guess what I'll be doing for the rest of the day?

I will be entering these pieces of work into the following challenges.

Colour Create Challenge - Yellow, blue and white.
Joanna Sheen challenge blog -  To someone special.

Thank you for visiting, hope to see you again soon. Do leave a comment to let me know what you think.
Cheers,
Jools. xx


Sunday, 15 April 2012

Springy bunny birthday easel card.

Good morning fellow bloggers,

I think it is JUST morning. Was up bright and early to do this post, but I felt I ought to do something about my craft room, it was bleeding all over the house!!!!!! Anyway, problem rectified, bleeding controlled and now for my favourite thing, crafting.

Today's is in keeping with the season, which, I have to keep reminding myself, is SPRING. How many people had hailstones yesterday, unbelievable. I digress.


The easel card is back. Haven't done one for a few posts and it is one of my favourite shapes. I think the rocker card may have knocked it off the top spot. The digital design is a clipartfairy creation, from the wee bunnies cupcake collection. I love the colours, definitely springy :) All the images are finished to a high quality and can be imported into most graphics programmes. I used MCS Professional for this one.


The backing paper for this design was a freebie, again from clipartfairy, can you tell I'm a fan. The shapes were all cut out and  glittered around the edges before being layered using mounting foam. They're not spellbinder shapes, they've been layered in a graphics program using puches. If you notice, the outer edges are different to the centre. These came ready done, but I've now learnt how to do it in CraftArtist Pro.

The image was also mounted with foam, after first curving it to add some dimension. I didn't bother decoupaging this one, I didn't think it needed it. It was finished with some card candy, a bow and some of my flowers,  I don't seem to be making much of a hole in them,(see my very first post) The ribbon is wired. I wasn't sure about using wired ribbon at first, but I quite like it now. The bow keeps its shape. It doesn't suit all cards though.


I always like to make a matching box for my big cards.  Would hate for all the embellies to get squished and flattened. I had to do plain white ones before I got my A3 printer, but now I can do patterned ones to match the card.  

Thanks for dropping by, enjoy your Sunday, n see you soon.

Jools. xxx

I'm entering this card into the following challenges :-


Crafters Companion Challenge Blog -  Four legged friends
Fab N Funky :- On all fours.
Digital Tuesday :- Birthday.
My Mum's Craft Shop :- Celebration.
Simon Says Stamp Challenge :- April showers bring spring flowers.
Cards For Men :- Spring colours
ABC DT Challenge blog :- Anything goes.
Pollycraft Monday Challenge :- Cute critters.


Thursday, 12 April 2012

A Wedding Card Rocker.

Good evening all,

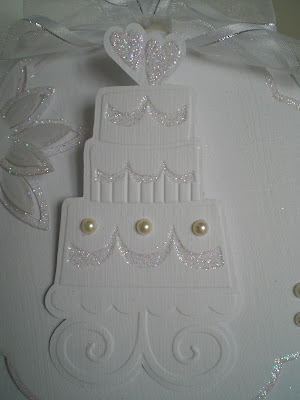
Just a quick post to show you a wedding card I've been playing with. I had the notion to do a white one a few days ago but couldn't decide on the style, so I opted for the rocker shape again. I think it works and the white with glitter makes it look so weddingy. What do you think?


The embossed wedding cake comes in the Sizzix wedding set #1, I decided to cut the cake out and use it more as a topper, not just an embossed background. In the end I mounted it onto a piece of acetate to allow it to dangle. I thought it gave the cake a nice dimensional feel.


The Spellbinders grand big scalloped circles form the basis of the main card, three pieces,  and have all been edged with glamour dust. The ribbon is twisted to emulate the bridal veil, then secured at the sides. The cake was also decorated with glamour dust and a few pearl embellishments added to one of the tiers. 


The flower was made using the spellbinders daisy flower topper die, again, all  the edges are glamour dusted and a pearl added to the centre. The sentiment is a silver peeloff mounted onto a spellbinder grommet tag. I used white linen 240gsm card throughout for this card.  


The back of the card was finished off with a wedding verse on a semi circle piece of white supersmooth paper.

I'm entering this card into the following challenges-

My Mums Craft Shop Challenge - It's a Celebration
ABC DT Challenge - Anything goes

Thanks for coming by and do leave a comment if you can, then I'll know what you thought. I do usually answer them all.

Bye......

Jools.  xx


Monday, 9 April 2012

Tea light cards.


Hope everyone has had a nice Easter Holiday. Pity about the weather though. So remaining in the theme of keeping warm and cosy, with a bit of naughtiness, I've made another card using the Craft Artist Cocoa Latte digikit. I've had this digikit for over a year now and didn't realise how lovely it is until now. This card isn't just a card though, as I've already said in an earlier post I like to make things a bit different from just run of the mill cards.


As you can see it's a card with a gift included, scented tea lights. These are cinnamon scent and have made the card smell lovely. I think it really adds to the appeal of the card. I made the card using the Crafters Companion Boxer board, it's actually one of the demo's on the crafters companion advanced construction dvd. The only deviation I made was the size of the card. Sara demonstrates it with 12x12 card stock, I found this left the actual card part too small, so for this card I used A3. It's only an inch wider, but you'd be surprised at the difference it makes.


All the pieces were distressed with Tim Holtz Antique Linen, including the edges of the box part of the card, the cream was sooooo bright. It all adds to the choholate feel. To give the card a finishing touch, I decoupaged some luscious pink marshmallows onto the frothy top. A nice sweet treat.

I'm entering this card into the Pan Pastels UK Challenge, sweet treats.


This card is my prototype, which, as mentioned above, was made using Sara's measurements. It doesn't look that different in the photograph, but believe me, it is smaller. It's a nice girly one this time. The decoupage and backing paper are from my Docrafts Me to You CD and the flower is from MCS printed in three sizes and layered.

I may try and make the card part even bigger next time, by joining two pieces of card at the spine. I'll have to experiment, it may throw the balance of the card out because the tea lights are quite heavy.


Thanks for popping by,

See you soon,

Jools. xxxx


Thursday, 5 April 2012

Rocker Card, Craft Artist Professional and Cocoa Latte digikit

Hi All,

Have been waiting to share this card with you for a couple of weeks now, but couldn't before today. It wouldn't be quite right for my daughter to see her card on my blog before her birthday, would it? Anyway, it's today, so here it is. I love it, it's all chocolaty and lush,  mmmmm.


I designed it with my CraftArtist Professional software, using the Cocoa Latte digikit. I've always loved the look of that digikit, but couldn't decide what to do with it, then it came to me. Rocker cards are quite popular at the moment, so I thought I'd do one, or two....... because I couldn't stop there. I liked it so much I decided to make my friend one for her birthday too.


I used a thick heavy card, about 350gsm, for the rocker base. The rest was printed on my trusty supersmooth, 220gsm and Grand Big Scalloped Circles to cut all the shapes. I distressed everything with Tim Holtz Antique Linen, which added to the choccy feeling. All the embellishments are  part of the digi kit. I cut the straw out and stuck it through a hole in the card, so it looked like it was in the hot chocolate. The flower I printed twice, one a bit smaller than the other, then layered them and finished it with a cloth covered button.  Finally, the tag was fastened to the coffee cup handle using a piece of red ribbon.


To finish the card off I put a circle shaped greeting on the back. The one drawback, if you stand the card on a shiny surface, it collapses. A bit like Bambi on Ice. Small price to pay though, eh? Hope you like them and thanks for dropping by.

I have entered this card into the following challenges:

ABC DT April challenge - anything goes
Simon Says Stamp challenge - My favourite tool, Grand Calibur.

T.T.F.N.


Jools.   xxx


Sunday, 1 April 2012

Wedding invitations and evening postcards.

I've just finished my first commission for wedding invitations, phew. Never realised how stressful it would be, they all need to be so perfect. I was scared to touch them in case I got a mark on them. So here they are, boxed and ready to go. I'm so pleased with the end result and the bride loves them.


I had to work to a budget, so the invites were kept simple. No pocket type with all the usual additional information inside. I did give the bride the choice of three toppers though. Entwined hearts, rings and champagne and glasses. They're all tonic punches and when matted they look the part. I used the two smallest spellbinders labels 1, just the right size for the tonic image.


The bride opted for the entwined hearts with her chosen colour of teal for the accessories. I sourced the pearls and ribbon from an ebay shop called weddings-on-a-budget. Very reasonable and with lots of colour matches. The wording is a standard  silver wedding peel off from Hobbycraft.  The insert was just a standard insert with a fancy teal coloured font and wedding rings.


The evening invitations are a bit different. I was told that Nat wanted postcard type. I took it literally to mean 'Postcard', so I set about designing some, even down to the stamp. We all had a good laugh about that when she came to visit for the final check, but as it turned out, she loved them. I must admit, they are quite unique, I don't think I've ever seen any.


So all's well that ends well. The design will definitely be going into my wedding portfolio. Anyway, must dash, Nat spotted my easel/drawer cards while she was here and ordered six. (I posted them on 14th March if you didn't see them) She wants them personalising for each bridesmaid and she's giving them as combined thank you cards and gift boxes for each one. She's bought them all a necklace which she will put in the drawers. What a great idea, never thought of that one. Well this is what my craft room looks like. It's a bit of a production line at the moment.


They'll keep me out of mischief for a while won't they? Trouble is, my new pan pastels are still sat in a box, screaming at me. Oh well, one day soon.

See ya soon.

Jools.  xx